Showing posts with label chocolate. Show all posts

Monday, March 5, 2012

Chocolate Smores Cheesecake

I made this larger version of my smores (smore?) cheesecake cupcakes for a manager's birthday at work. What makes it different is a layer of graham crumbs and marshmallows in its middle. When the cake was cooked, set and cooled the marshmallows didn't keep to their layer, but blended in with the rest of the cake, leaving behind a thin layer of graham crumbs. This is probably what made this cake extra creamy, I was told by its indulgers. In fact, most thought it was a chocolate mouse cake! Far from an insult in my opinion, however I would still like to perfect a white, puffy center.

Filling:
4 pkg cream cheese
4 eggs
1 cup sugar
3/4 cup cocoa
1 tbsp. vanilla
1/2 cup graham crumbs
1/2 cup butter, melted
1 cup mini white marshmallows

Crust:
1 cup graham crumbs
1/2 cup butter, melted

Topping:
Broiled marshmallows
Dulce de leche
Shaved dark chocolate

For the crust, mix all of the ingredients into a large bowl until the crumbs absorb all of the butter. Press firmly to the bottom of your spring form pan and bake at 350 for 10 minutes. Set aside in the fridge when it's finished.

While the crust is cooling/baking blend the cream cheese, eggs, sugar and vanilla in a food processor. This is double the regular recipe so there's a lot of it, you may need to stop and scrape the sides. I recommend creaming the cheese and sugar for about two minutes.

In a pan on the stove heat up a half cup of butter. Once its melted remove from the heat and stir in the cocoa until it's all absorbed. Add this to the processor and blend until all of the contents have turned brown.
Before you add the filling to the pan, wrap the spring form in tin foil up to its rim. We're going to bathe the cake while it's baking.

Once you've done this pour half of the filling on top of the crust. If you have extra crust mixture left over make a thin layer of it on top of the filling you just added. If you don't have extra, simply make some more the same as you did for the crust. I recommend approximately a 1/2 cup of crumbs. Then sprinkle your desired amount of marshmallows, I used 1 cups worth.

Next simply pour the rest of the filling on top of the marshmallows, just make sure the filling gets to the rim of the pan so you have a full shaped cake.
We will be baking the cake as the pan sits in a deep roasting pan filled with water. This will make the cake creamier and it will set very evenly on its surface. Make sure you select a roasting pan that is deep enough so we can submerge half of the cake in water. I recommend putting the cake and the roasting pan in the oven, then filling it up with water.

Bake it like this at 350 for about an hour. If the top starts to cook too fast by bubbling or browning, turn it down to 325 after 30 minutes. After the cake has been in the oven for one hour turn the oven off but let the cake remain inside for another 30 minutes. Remove and let it cool on the counter before letting it cool int he fridge.
As for the topping, on a greased baking sheet make a circular mound of marshmallows and broil in the oven at 400 degrees for about 30 seconds, or until they brown to your desire. Keep the oven open and watch closely, they will burn fast. The hard part is transferring them onto the cake. If it makes a mess or your having trouble, transfer them on the cake, then add some more on top and broil quickly again. However, you don't want the top of the cake to broil so make it quick.

I also added dulce de leche and shaved dark chocolate as extra garnish.

Monday, January 2, 2012

Christmas Basket 2011


Inside: Shortbread macarons w/ Dulce de Leche
Cheesecake ginger swirl lollipops
Mint chocolate cookies
Maple banana bread

Shortbread Macarons with Dulce de Leche

1 cup icing sugar
1/2 cup corn starch
1 tsp. vanilla
3 cups flour
Baker's semi-sweet chocolate, 1 box
1 cup butter
condensed milk, 1 can


The night before you make the macarons your going to want to make the Dulce de Leche. See Dulce de Leche for directions.


Whipped shortbread

Cream the butter and icing sugar with a hand mixer until fluffy. Add cornstarch and vanilla, then add the flour one cup at a time. Mix all the ingredients thoroughly; the more "whipped" the better!

To get the disk shaped cookies I hand rolled the batter into balls approximately 1 inch in diameter. You may need to keep rubbing your hands with flour so it doesn't stick.

Cover a baking pan with parchment paper, and spread the balls approximately 1 1/2 inches apart. Once placed, gently press down the balls to give them a flat top and rounded edges. Try not let the batter crack while doing this, however it is easy to smooth the edges.

Bake at 325 degrees for 20 minutes, or until you can see the bottoms slightly brown. Try to catch them on the brink of browning. The less cooked they are the more they will melt in your mouth, but you don't want them to be under-cooked.


When melting the chocolate I took the easy way out and melted it in a pot with butter. This does make it more difficult to work with but it still works!

Find a utensil that will have minimal contact with the shortbread while dipping in chocolate; I used metal tongs. Finding your own technique is what will work here - after i dipped each cookie I placed my middle and index finger on its flat side to flip it upright and gently place it on parchment paper. It's a messy job!

Let the dipped shortbread cool completely in the fridge before you sandwich them into pairs.

For the next step you need to use a found object around the house that will act as a stand to place the bottom half of the macaron on. It should also have minimal contact with it to prevent smudging.

Place one cookie flat side up on your stand and pipe the Dulce de Leche around its edges and a little bit in its middle. I used a plastic squeeze bottle. Take your second cookie and place it right side up, on top. Do this for however many pairs you can make.

Put the macaroons immediately in the fridge. You may find some of them sliding once the Dulce gets warmer, but just slide them back into place. Once they cooled I went around the edges with the Dulce, this will give them a dripping effect.


Mint chocolate cookies


2 1/4 cup flour
1/2 tsp. baking soda
1 cup butter, softened
1/2 cup sugar
1 cup brown sugar
1 tsp. salt
2 tsp. vanilla
2 eggs
Baker's white chocolate, 3 pieces
mint extract, to taste
green and red food colouring

Combine the butter and both sugars with an electric beater, add vanilla and eggs. In a separate bowl mix the flour baking soda and salt. Combine the two mixtures together by hand.

Kneed a small handful of dough in your hands and place on a piece of parchment paper. Using a flat, water proof surface (I used a square of flimsy plastic material similar to what stencils are made of) flatten the dough by pressing on it with your hands. The thickness should be close to a 1/4 of an inch. Carefully peel off your material so it doesn't create holes in the dough. Apply whichever cookie-cutter you desire. I chose to keep it simple with a small circle.

Leave about an inch between each cookie, they shouldn't expand too much.

Bake at 350 degrees for 15 to 20 minutes, or until the bottoms are slightly brown. They are meant to be chewy so don't over cook!

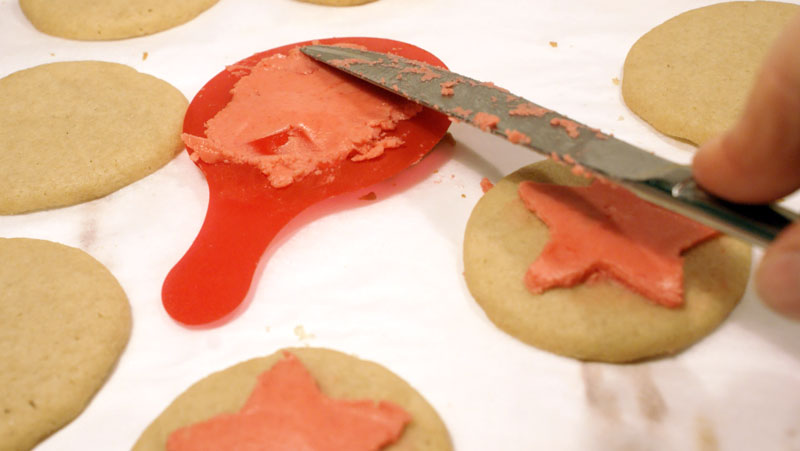
Next heat up the chocolate in a pot with butter. White chocolate is different than regular chocolate because it doesn't liquify when it's heated. This actually works well in this case because its easy to spread over the stencil, making a clean-cut shape on top of the cookie.

I divided the batch into 3 stencil designs. 1 package from a box of Bakers chocolate will make enough for 1 third of the designs. Heat up the chocolate separately since it hardens quickly.

Once you remove each portion of chocolate from the heat stir in the mint extract to taste. I used about 1/2 to 1 teaspoon for each batch of chocolate, which gives it a medium to strong flavour. Add the food colouring by preference as well.

Use the flat end of a knife to spread the chocolate over the stencil. The stencil will be more crisp if you spread a thick layer of chocolate and slowly remove the stencil from the cookie.


Cheesecake ginger swirl lollipops


2 eggs
2 pkgs regular cream cheese, softened
1/4 cup granulated sugar
1 teaspoon pure vanilla extract
2 1/2 cups sweet molasses
Bakers semi-sweet chocolate, 1 box

Sweet molasses & brown sugar reduction


Brown sugar reduction :

2 cups water
2 cups brown sugar
1 tbsp. cinnamon
2 tbsp. ground ginger

Add water to a medium sized saucepan and bring to boil.

Add sugar, cinnamon and ginger. Stir until dissolved.

Cover and let simmer for 15 to 20 minutes at medium to low heat, stirring occasionally.

Let cool in fridge. The mixture should thicken into a syrup.

A way to test this while heating is by dabbing some of it on the counter to see if it thickens at room temperature.

Sweet molasses:

1 1/2 cups brown sugar reduction
1 cup fancy molasses
1 tsp. butter

In a saucepan add butter over medium to high heat. Once melted add molasses and heat until it begins to bubble. Oil can be used instead of oil but I like to use butter for taste.

Add your brown sugar reduction and stir until it is mixed well with the molasses.

This only needs to heat for a few minutes; enough time for the mixtures to mix. You don't want to actually cook the mix or burn it.

Remove and let cool completely in the fridge.


The cheesecake

Combine everything except the molasses in a food processor until well blended.

Since the outcome of this recipe is not an actual cake, technique does not matter while combining these ingredients (normally I would fold in the eggs so the cake would rise flat).

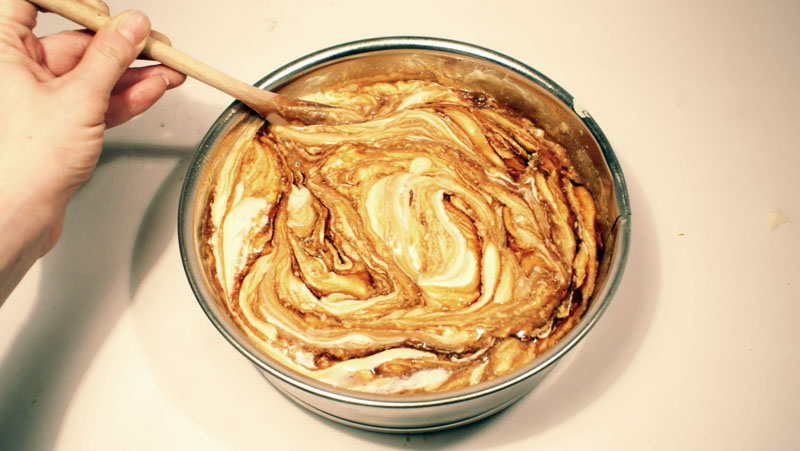
Gradually add the molasses, slowly stirring it into the batter to create a swirl effect.

Pour into a grease springform pan and bake at 350 degrees for approximately 30 to 40 minutes. It's okay to over-cook it a little since dense cake is desired to shape the pops.

The cheesecake needs to chill for a very long time. I put it in the fridge until it cooled down completely, then in the freezer overnight.


The toughest part is creating balls of cheesecake. Frozen cheesecake is very cold to touch and melts very easily in your hands. I found that I had to do a few at a time, putting each ball in the freezer as I went along, and sometimes putting the cake back in the freezer to re-harden. If you have a good ice cream scoop this might not be a problem, but I found I had to form the balls using my hands.

Once you have created your cheesecake balls put them in the freezer for roughly an hour. They need to be vey firm to put on lollipop sticks.

When you are ready to dip the pops in chocolate make sure they are firm as well or they will slide off the sticks.

Next heat up the chocolate, used Bakers semi-sweet chocolate. If you know how to temper chocolate - great - if you're like me and didn't get a thermometer until Christmas, put some butter in a pan and melt it! However this does mean the chocolate will begin to go soft at room temperature so always keep refrigerated!

Make sure the chocolate completely covers all of the cheesecake. Immediately put each pop in the fridge once the chocolate begins to harden.

Maple banana bread


1/2 cup butter, softened
1 cup sugar
2 eggs
1/4 cup milk
1 3/4 cup flour
1 tsp. baking soda
2 tsp. baking powder
1/4 tsp. salt
1 tsp. vanilla
1 cup banana, ripened
1/2 cup pure maple syrup


Mix buyer, sugar, eggs, milk, vanilla and maple syrup in a bowl. Set aside.

In a separate bowl sift flour, salt, baking powder and soda.

Combine the two mixtures and add to a well-greased baking pan. If you use mini pans like I did leave about a 1/4 inch from the rim to allow for rising.

Bake at 325 degrees for 20 minutes. Test with a skewer and allow for moisture.

Let cool before you decorate.